Homemade Sauerkraut Recipe (Easy Traditional Method)
Homemade sauerkraut is one of the simplest ways to preserve cabbage and bring the harvest into the winter months. Every year, sometime between the last flush of summer and the first cool evenings of fall, the cabbage starts piling up on the counter.
The tomatoes have slowed down, the garden is beginning to look tired, and those beautiful heads of cabbage are waiting for a purpose. For generations, that purpose was often sauerkraut.
Long before freezers and grocery stores lined every corner, families relied on simple methods to preserve the harvest. A crock of fermenting cabbage tucked away in the pantry or cellar could provide fresh flavor and nourishment throughout the winter months.
The beauty of sauerkraut is that it requires very little. No special ingredients. No complicated equipment. Just cabbage, salt, and a little patience.
If you’ve never made sauerkraut before, don’t overthink it. Fermentation has been happening in farmhouse kitchens for centuries. Once you learn the basic process, you’ll wonder why you ever thought it was difficult.
One of the things I love most about homemade sauerkraut is that it doesn’t require fancy equipment. Generations before us fermented cabbage in stoneware crocks tucked away in cool pantries and cellars. Today, many home cooks use those same traditional crocks, while others prefer the simplicity of a mason jar.
Affiliate Disclosure: From time to time, I share products and tools I genuinely love. If you purchase through one of my affiliate links, I may earn a small commission at no extra cost to you. Thank you for supporting Flour Sack Wisdom and the work that goes into preserving and sharing these timeless homemaking skills.
If you enjoy thrifting old kitchenware, keep an eye out for vintage fermentation crocks. They’re becoming harder to find, but they still show up occasionally at estate sales, antique stores, and thrift shops. There is something special about putting a well-loved crock back to work after decades of sitting on a shelf.
If you’d rather start with a new one, a traditional fermentation crock is still one of the easiest ways to make larger batches of sauerkraut at home.
Whether you’re filling a traditional fermentation crock or a simple quart jar, the process remains the same: cabbage, salt, and a little patience.
Around here, homemade sauerkraut is one of those recipes that quietly finds its way onto the table all year long. We pile it on sausages, serve it alongside roasted meats, and sneak forkfuls straight from the jar while standing in front of the refrigerator.
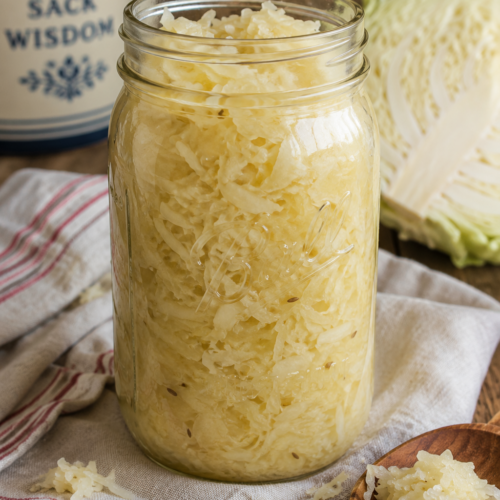
Traditional Small-Batch Sauerkraut
Print RecipeIngredients
- 1½ pounds cabbage finely shredded
- 1 tablespoon fine sea salt non-iodized
Instructions
- Place the shredded cabbage in a large bowl and sprinkle with the salt.
- Massage the cabbage with clean hands for 5–10 minutes until it softens and releases its natural juices.
- Pack the cabbage firmly into a clean quart jar, pressing down as you go to remove air pockets and bring the brine above the cabbage.
- Place a reserved cabbage leaf over the top to help keep the shredded cabbage submerged.
- Cover loosely with a fermentation lid, airlock, or clean cloth.
- Allow the sauerkraut to ferment at room temperature for 7–14 days.
- Begin tasting after about one week and continue fermenting until it reaches your preferred level of tanginess.
- Once finished, seal the jar and store it in the refrigerator.
How to Know Your Sauerkraut Is Fermenting Properly
One of the most common questions beginners ask is, “How do I know it’s working?”
Thankfully, healthy fermentation gives a few reassuring signs.
Bubbles Are Appearing
Small bubbles rising through the brine are a good sign that fermentation is underway.
It Smells Fresh and Tangy
Sauerkraut should have a clean, pleasantly sour smell. It should never smell rotten or putrid.
The Cabbage Remains Under the Brine
Keeping the cabbage submerged is one of the most important parts of successful fermentation. Exposure to air can encourage mold growth.
The Flavor Changes Over Time
Fermentation is not an exact science. Temperature, cabbage variety, and personal preference all play a role. Start tasting around day seven and continue until it reaches the level of tanginess you enjoy.
A Simple Tradition Worth Keeping
There is something satisfying about transforming an ordinary head of cabbage into a jar of homemade sauerkraut.
It is a reminder that some of the best things in the cottage kitchen are also the simplest. A little salt, a little patience, and a tradition that has been feeding families for generations.
Benefits of Homemade Sauerkraut
For generations, sauerkraut was valued not only as a way to preserve the harvest, but also as a nourishing staple during the winter months. During fermentation, naturally occurring bacteria transform fresh cabbage into a tangy food rich in beneficial probiotics.
Many people enjoy fermented foods because they help support a healthy gut microbiome and add beneficial bacteria to the diet. Fermentation also helps preserve certain nutrients naturally found in cabbage.
Beyond its nutritional benefits, homemade sauerkraut is an economical way to preserve an abundant cabbage harvest using only two ingredients. A single head of cabbage can become several jars of flavorful sauerkraut that can be enjoyed for months.
Whether served alongside roasted meats, piled onto sandwiches, or eaten straight from the jar, homemade sauerkraut is a simple traditional food that continues to earn its place in the cottage kitchen.
Can I use red cabbage?
Yes. Red cabbage ferments beautifully and creates a vibrant purple kraut.
How long does homemade sauerkraut last?
When refrigerated, properly fermented sauerkraut can last for several months.
Do I need a fermentation weight?
No. A reserved cabbage leaf and careful packing often work just fine.
What if mold forms?
If mold develops on exposed cabbage above the brine, discard the batch and start over.